Pages

Tuesday, February 18, 2014

Pork Tenderloin with Apples and Caramelized Onion

I never thought I like pork until I discovered pork tenderloin and a good meat thermometer. Now I'm hooked.


2 pork tenderloins
Montreal Steak Spice 
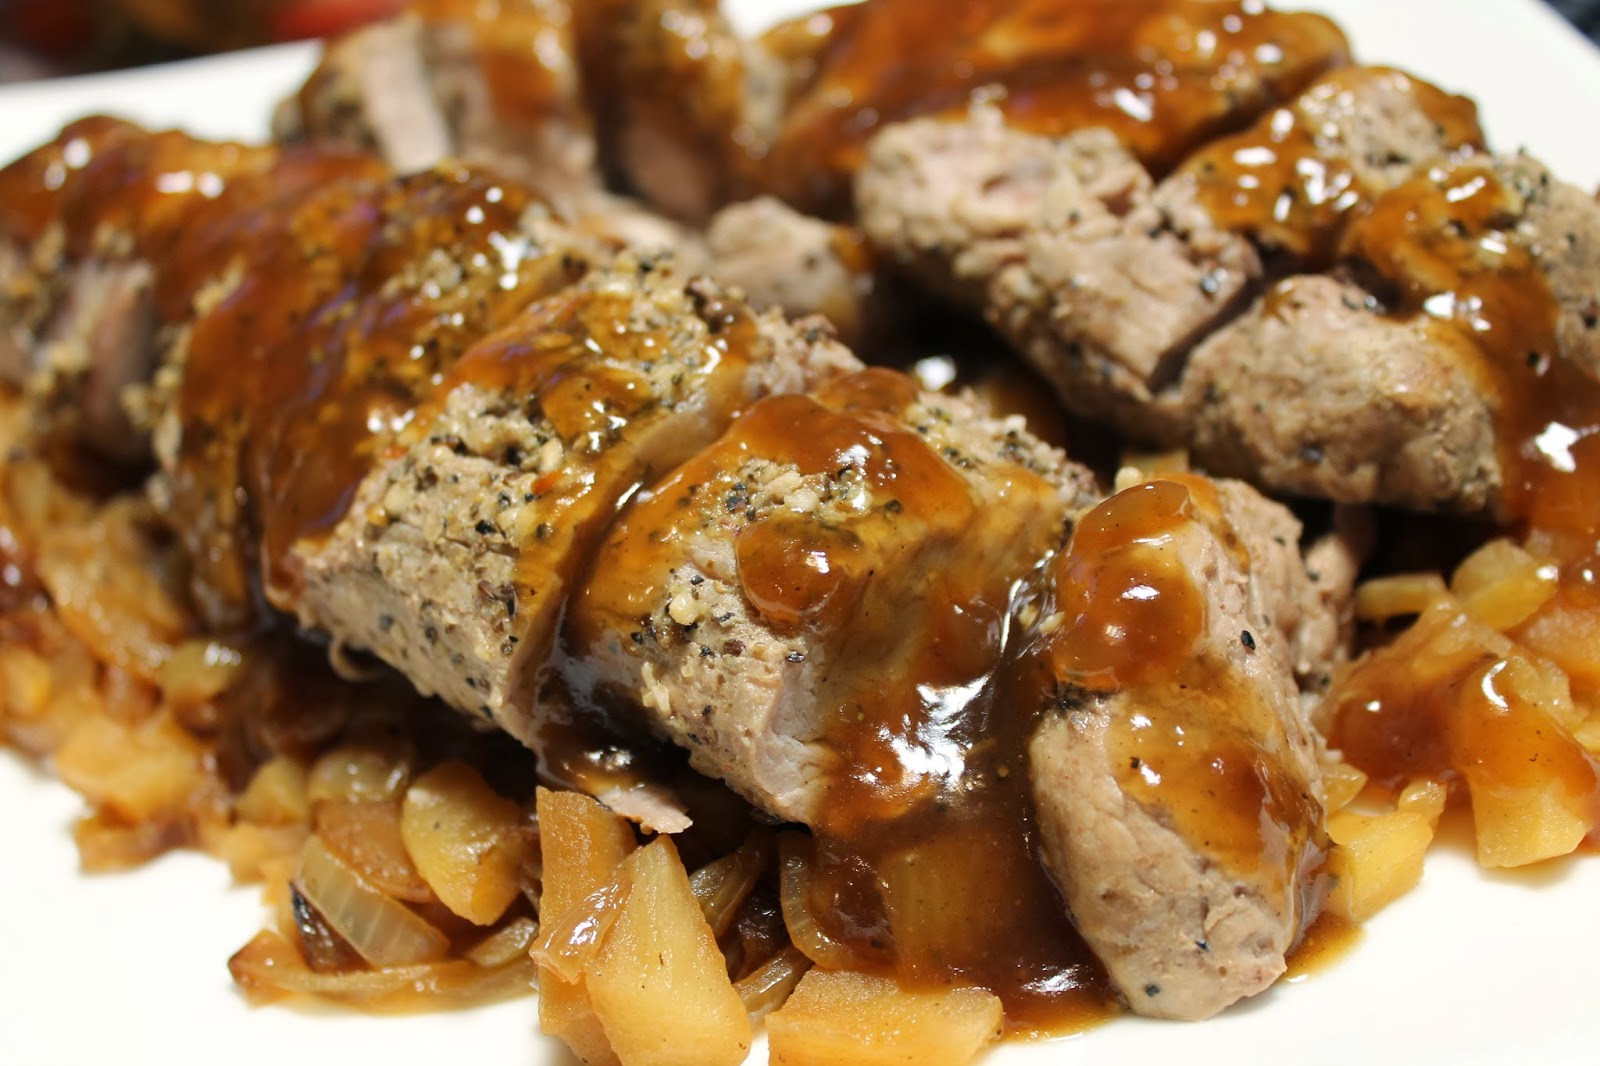
4 medium onions, sliced
2 or 3 apples, peeled and sliced
3 tbsp olive oil
Montreal Steak Spice
2 cups beef stock
1/2 cup apple juice
2 tsp cornstarch

  1. Season tenderloins with a generous amount of Montreal Steak Spice.
  2. Grill on a barbecue or roast in the oven at 400 F (200º C) until meat thermometer reads 150 F (65º C). Remove from the grill or oven and wrap in foil for 10 minutes before slicing. Now, don't let the lower temperature scare you. Apparently, it's safe to eat pork at this temperature since pork is not as dangerous as it was in your grandparent's day. Besides, if you leave your thermometer in the meat while it's wrapped in foil, you'll notice the temperature keeps on rising and will hit 160 F, so everyone's happy and Health Canada won't condemn you.
  3. While meat is cooking, cook onions (gently!!) in a skillet for 10 minutes. Add the apples and cook another 10 minutes. You want caramelization, not a burnt offering.
  4. When the onions and apples are done, remove them from the skillet (but keep them warm) and pour the beef stock and apple juice into the same skillet. Bring to a boil and continue boiling until reduced to about 1 cup.
  5. Dissolve cornstarch in a small amount of cold water. Stir into sauce and cook until sauce is thickened. 
  6. Arrange onions and apples onto a platter. Top with the tenderloin slices and drizzle with sauce.


Tea Biscuits


I love biscuits! I especially love biscuits with butter, buttermilk, cheese and garlic. My mouth is watering as I type. I'm not kidding. You could make these with margarine but really you should skip the one molecule from plastic and go with the real stuff. I like these with or without cheese and garlic. If you want them plain, also skip the final step of pouring the butter over before they're done baking. What you could do instead, is brush the tops with milk before putting them in the oven. The last time I made these, I skipped the cheddar and in the last five minutes, mixed up some melted butter, garlic and Parmesan and poured over the top. I found it a little salty, so you could probably cut back on the salt in the recipe if you wish. One more thing: when I make the cheese biscuit version, I skip the sugar. You won't miss it.

2 cups flour
1 tbsp sugar
1 tsp salt
4 tsp baking powder
1 tsp garlic powder, optional
1/2 cup butter or margarine
1 cup grated cheddar, optional
1 cup cold milk or buttermilk

1/4 cup butter or margarine, melted
1 tsp garlic powder
1/2 tsp parsley flakes


  • Mix together flour, sugar, salt, baking powder and garlic powder.
  • Cut in butter until mixture is crumbly, or mix in a food processor for a few seconds.
  • Add cheese.
  • Add milk to make a soft, sticky dough. Sometimes I find the dough is too wet, even though I measure the same way each time, so I have added more flour and no disaster ensued. Try not to over-mix the dough, which could result in tough biscuits.
  • Shape into biscuits and arrange in a greased baking dish. You will find the dough too sticky to roll and cut out the biscuits. Never mind, because I find that method a complete waste of time and energy.
  • Bake at 375° anywhere from 20 to 30 minutes, depending on the size of your biscuits.
  • Just before they are finished baking, mix together the butter, garlic powder and parsley and pour over the biscuits. Return biscuits to the oven for about 5 minutes.
  • Serve warm!

Monday, February 17, 2014

Chili

Recipes for chili abound. Everyone has a favourite and this might not be yours, but it's mine! It's completely versatile. It's one of those dishes where any ingredient is optional and all ingredients can be increased or decreased according to one's preference or to what you find on your kitchen shelves. I like it spicy. Are you surprised? The exciting thing about adding jalapeños is you never know what you're going to get in the end. Sometimes I'm breathing fire and other times I resort to adding some crushed red chilies and cayenne pepper at the end. I remember one time I added four large jalapeños, seeds and all, to a pot of chili. It kept me warm all night long. You can use canned kidney beans to save on time but you might end up sleeping alone for the night.

3 cups dry kidney beans
2 lbs ground beef
1/2 tsp salt
2 onions, chopped
2 green peppers, chopped
2 large jalapeños, chopped
4 cups mushrooms, sliced 
4 cloves garlic, minced
2 cups frozen corn
1 can brown beans
1 large can diced tomatoes
1 can tomato soup
1 can tomato paste 
1 large can crushed tomatoes
1 tbsp basil
1/4 cup chili powder
Salt, if needed
Sugar, if needed
  1. Soak beans in water overnight. Drain and rinse. Cook in salted water until soft - about an hour, sometimes more.
  2. Scramble fry the ground beef with a little salt. Drain fat.
  3. Sauté  onion, peppers, mushrooms and garlic. I usually do the onion and peppers together, adding the garlic near the end because it doesn't take long to cook. Then I sauté the mushrooms by themselves. They don't behave properly with other vegetables. If you wish, you don't need to sauté any of the vegetables. They can go straight to the pot, but sautéing them enhances the flavour and boiled garlic isn't all that palatable, so <gasp> I would substitute garlic powder.
  4. Add all ingredients to a very large pot or crock pot. I prefer a crock pot because I don't want to spend time and energy stirring the chili every ten minutes to keep it from burning on the bottom. You can let it simmer until it's heated through or leave it to simmer for hours. 
  5. Make sure you check the flavour before you're done. You might need more spices or salt depending on the sodium content of your canned ingredients. You also might need to add some sugar if it tastes bitter. I use the canned beans with maple syrup, so sugar isn't necessary.
  6. Whatever you do, don't throw uncooked beans in the pot with the ingredients thinking to save time. You will spend the rest of your life waiting for them to cook. The acid in the tomatoes prevents them from cooking. Ever.

Friday, February 14, 2014

Crispy Oatmeal Cookies

Now this is a perfect afternoon...


Okay, now before you all get jealous on me, the tea cup was empty, the cookies were still frozen and I was up to my eyeballs in chilli. I made so much I couldn't fit it in the pot. Actually, this happens every time I make chilli, so I should not be surprised. And I have yet to crack open that book.

These cookies were originally called Ranger Cookies. My mom remembers eating them when she was a wee lass. Not these particular ones, of course. I changed the ingredients considerably, so I thought they should have a new name. That, or the fact I've never seen a ranger or his cookies.

1 cup butter or margarine
1 cup white sugar
1 cup brown sugar
2 eggs
2 tsp vanilla
1 cup white flour
1 cup whole wheat flour
1 tsp baking soda
1/2 tsp baking powder
1/2 tsp salt
2 cups crisp rice cereal
2 cups large flake oats
1 cup unsweetened coconut


  1. Cream butter and sugars.
  2. Beat in eggs and vanilla.
  3. Mix in flour, baking soda, baking powder and salt.
  4. Get your hands in there and mix in the cereal, oatmeal and coconut.
  5. Drop onto a cookie sheet and bake at 350 F (180º C) for 8 minutes.

The original recipe called for raisins, which I detest in anything baked, but you may not have the same sentiments, so feel free to add some. I cut out some of the sugar from the original recipe. Feel free to experiment there. You could use all white or all whole wheat flour in this recipe. I wouldn't substitute quick oats. It does horrible things to recipes calling for large flake oats. Crisp rice cereal, AKA Rice Krispies. I was trying to be all 'brand name free'. Which leads me another rabbit trail. The No Name version makes for a ghastly batch of Rice Krispies Squares. Don't do it!

Wednesday, February 12, 2014

Southwestern Burritos

Several years ago I spent some time in Texas, where people love to eat! It's true, everything is big in Texas - big oil pumps, big cowboy hats, big belt buckles, big dinner plates and big toilet paper rolls (you think I'm kidding). I never ate so much food in my life. I was introduced to jalapeños, enchiladas, breakfast burritos - and Chili's Southwestern Egg Rolls. I have waited nine years to sink my teeth into one of those gems. Of course, now that I've discovered that Fargo has a Chili's and a real Mexican restaurant, I shall return. Just for the food. I also discovered, compliments of Google, that many people have tried copying Chili's Soutwestern Egg Rolls, so here is my version. I don't know why Chili's called them egg rolls because they use tortillas. This one looks more like a burrito and I don't deep fry them, which is sad because it's really good that way! But when you eat as many as I have in the last month or so, it's a good thing they're not coated in grease. I have a confession to make, I hid the last one yesterday so I could have it for lunch. Sorry honey! I'll make you some more, I promise.

2 large chicken breast fillets, seasoned with salt, pepper and garlic
Olive oil 
1 cup red pepper, diced
1 jalapeño, diced
1 bunch green onions, chopped
1 clove garlic, minced
1/2 bag fresh spinach or 1 package frozen spinach, thawed and drained 
1 1/3 cups frozen corn 
1 cup black beans, cooked
1 tsp cumin 
1 tsp chilli powder 
Salt  
Cayenne pepper 
2 cups shredded Monterey Jack cheese 

12 flour tortillas

Avocado Ranch Sauce
1 avocado, mashed
1/2 cup mayonnaise 
1/2 cup sour cream 
2 tbsp buttermilk 
3 tsp white vinegar 
1/2 tsp salt 
1/2 tsp dried parsley 
1/2 tsp onion powder 
1/4 tsp dried dill weed 
1/4 tsp garlic powder
Cracked Pepper

1. Grill the chicken on a barbecue or indoor grill. I used the George Foreman grill since it is currently minus a billion outside and I draw the line at barbecuing past -20 C. 


2. Saute the red pepper, jalapeño, green onion and garlic. If you don't like the heat, remove the seeds from the jalapeño. Really, what's the point of using a jalapeño if you're going to throw away the best part? Just use a green pepper and save your hands from being on fire for a few hours.


3. Add spinach, corn, beans and seasonings. Omit the cayenne pepper if you can't take the heat. Continue cooking until the spinach is wilted and the mixture is hot. Remove from heat and stir in the cheese. (No one will know if you cut off a chunk of that Monterey Jack and eat it.) The last time I made these, they were for a bridal shower. I doubled the recipe and got stingy with the Monterey so I used half Monterey and half mozzarella (minus the one little chunk of Monterey).

4. Assemble burritos. You may end up with more or less, depending on how much filling you put in each one. At this point you can throw them on the grill if you plan on eating them right away or wrap them individually in foil to refrigerate or freeze for later. If you don't have a grill, you can just bake them in the oven, wrapped or unwrapped, depending on how crunchy you want them.

5. Serve with Avocado Ranch Dipping Sauce. You don't have to, but you should. You can cut these in half and use them as an appetizer or leave them whole and make it a meal.

6. To make the sauce, throw everything in a blender or food processor. If you're using something like Miracle Whip instead of mayonnaise (I personally thinking mayo is disgusting unless you disguise it in a recipe), just omit the vinegar.


Tuesday, February 4, 2014

Apple Pecan Salad

This is my new favourite salad. I will most likely keep eating it until I'm sick of it and then discover a new favourite salad. It's really yummy with avocado slices too. If you want to take it to work, I discovered that if you mix the apple slices with the dressing, they don't turn brown. Take the time to toast the nuts because it really enhances the flavour. I do it in a dry frying pan - and usually forget that I'm toasting them until I see the smoke rising...

Mixed salad greens
Sliced apples
Dried cranberries
Toasted pecans or walnuts
Crumbled feta
Poppyseed dressing